[circuit bending]
[introduction]
[tools]
[parts]
[exploring the art]
[how
it works]
[direct wiring]
[potentiometers]
[capacitors]
[photo resistors]
[solar cells]
[leds]
[humidity sensors]
[body-contacts]
[reset switch]
[line outputs]
[other techniques]
[cautions]
[closing words]
|
|
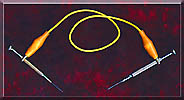
First, clip the smallest
two metal jeweler's screwdrivers in the alligator clips at the ends of the test lead. This
gives you a wire with a probe at each end, and is your most important circuit-bending
tool. (Obviously, a custom test lead with a permanent probe at each end can be made for
this job, as well as the elaborate console described at the end of the tools section).
|
Remove the back from the game or toy to expose the circuitry.
Turn the device on and activate the sounds (press keys/buttons, or tape/wedge in place to
sustain sound production).
With the device MAKING A NOISE, press the tip of one of the test lead's screwdrivers to a
printed circuit trace, component lead or integrated circuit pin. Keep this screwdriver tip
in place for the next step.
|
Now, with the other screwdriver at the opposite end of the test lead, begin touching
various parts of the circuitry while listening for interesting changes in sound.
Electricity will follow the new course you've provided with the lead. This may have no
effect on the sound at all. On the other hand, the audio effect may be outrageous.
Each time an interesting sound is created, note with a marker directly on the circuit
board the pair of points that were connected to each other to create the sound.
Once the traveling end of the test lead has explored the circuit's corners and all
interesting connections have been noted, place the stationary screwdriver tip on a new
circuit point.
Again, the traveling end of the test lead explores the rest of the circuit; interesting
sound-changing connections are marked.
This process is repeated until the entire circuit has been searched in such a manner.
Given a bit of luck, the circuit will now be marked with a number of potential connections
discovered with the test lead.
At this point, a number of choices face the explorer in implementing the creative
short-circuits discovered:
|